Ad tagging is a crucial component of your display advertising efforts. Not only do ad tags play a huge role in optimizing your ad strategy, but they can also help you measure its performance.
Let’s kick off this article by breaking down what an ad tag is.
Table of contents
- What Is an Ad Tag?
- How ad tags work?
- Why Should I Use an Ad Tag?
- Types of Ad Tags
- Example of an Ad Tag
- What Is a ClickTag?
- What are the click tag guidelines from Google?
- How can you generate an Ad Tag using Creatopy?
- Final Thoughts
What Is an Ad Tag?
An ad tag is a small piece of code, typically written in HTML or JavaScript, that serves as a placeholder for ads on websites or apps. It essentially acts as an instruction manual, detailing where and how ads should be displayed on a website or app.
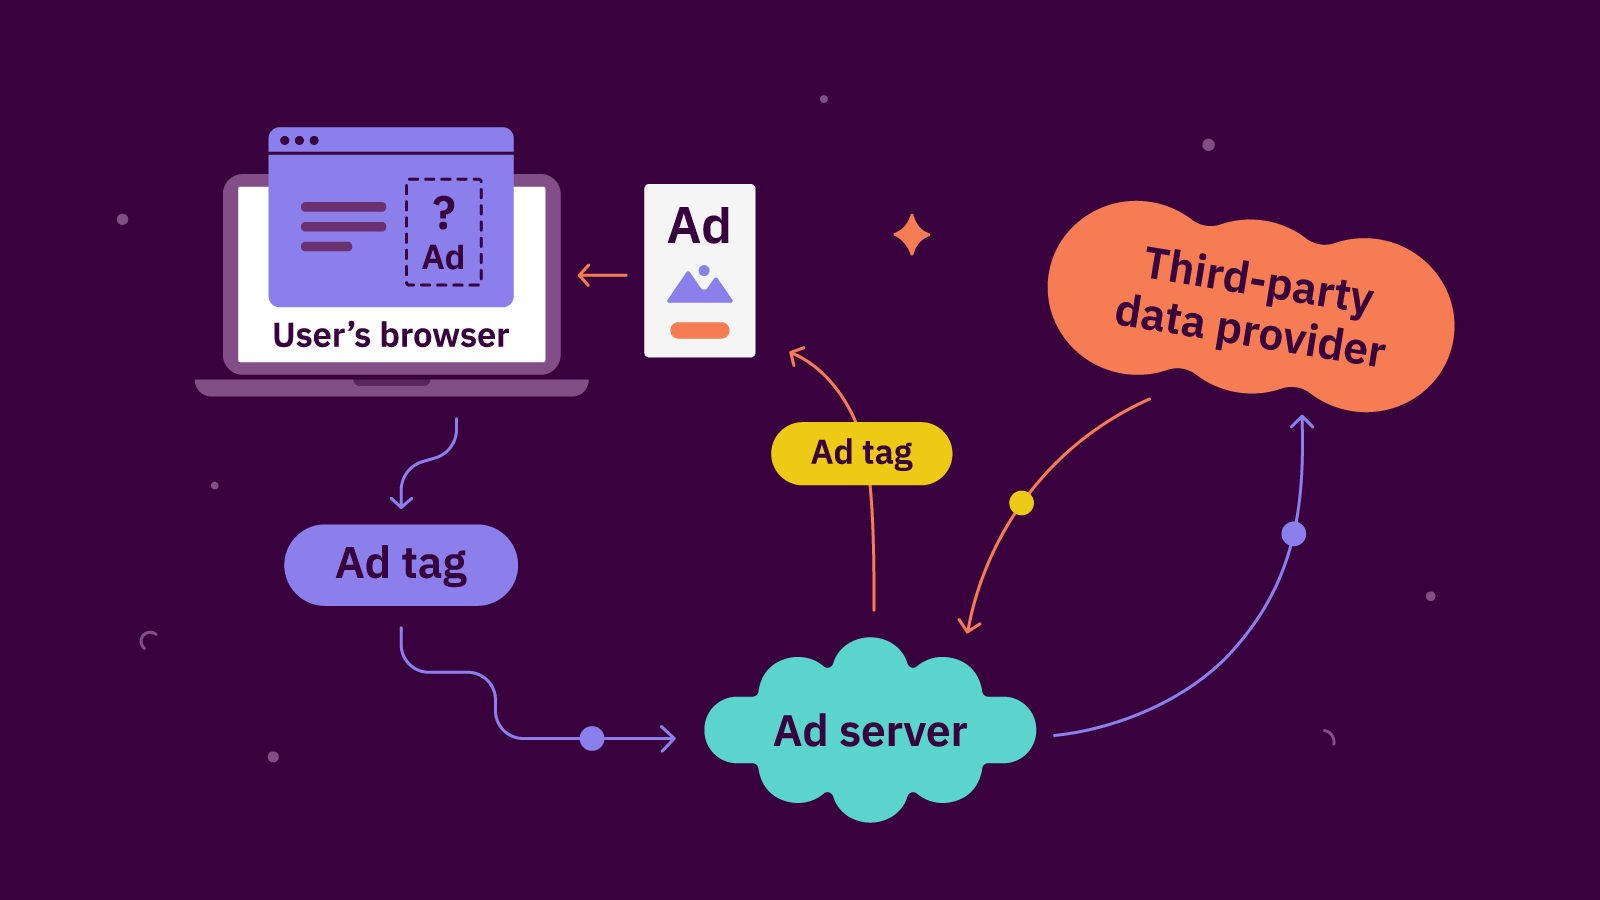
How ad tags work?
When a person visits a website, the user’s browser will send an ad tag to the ad server. The ad tag contains information about this particular user and the ad placement.
The next step is for the ad server to pass the ad tag to a third-party data provider in order to fetch information about user segmentation or targeting.
Then, the ad server passes the ad tag back to the advertisers.
The last thing that happens is that the ad server delivers the ad to the user’s browser. This means returning an ad tag with the creative URL, where the creative itself is hosted on a third-party hosting provider.
Why Should I Use an Ad Tag?
Ad tags play an essential role in display advertising, which is a form of online advertising that typically involves visual and interactive ads displayed on websites, social media platforms, and mobile applications. In this context, ad tags are snippets of code that help deliver ads to the right place at the right time, track ad performance, and optimize ad delivery for specific audiences.
Here are the main reasons why you should use an ad tag for your digital marketing campaigns:
- Collect information about the users who are shown ads for user segmentation purposes;
- Optimize your ad strategy quickly and easily because you can rotate the content however you want and adjust as you move along;
- Make changes and optimizations from the ad server instead of going directly to each publisher;
- Track ad engagement and viewability.
Types of Ad Tags
There are three types of ad tags: synchronous, asynchronous, and third-party
- Synchronous ad tags load simultaneously with the rest of the app’s content. This means that the ad request must be triggered and the ad must be served before the app can load. If there is an error in the process, it could slow down the app’s loading speed or prevent it from loading altogether.
- Asynchronous ad tags, on the other hand, load independently of the remaining content of the app. This means that the ad serving process doesn’t interfere with page speed or user experience. If the ad request fails or an error occurs, the app’s page will still load, but the ad won’t.
- Third-party ad tags are generated by demand-side platforms (DSPs) or an advertiser’s ad server. They refer to HTML code snippets that help track ad impressions and engagement. Ad exchanges can also generate third-party ad tags to help publishers allow multiple advertisers to display ads on their apps.
Other types of ad tags include VAST ad tags (for video ads), iFrame/JavaScript tags, and universal JavaScript tags.
Example of an Ad Tag
The code snippet down below initiates communication with Google Tag Manager when the webpage loads. The ad server then looks for the most suitable ad to fill the designated space (“my_ad_slot”) based on factors like targeting parameters or available ad inventory. If a relevant ad is found, it will be displayed within the webpage in the allocated space.
<script>
var googletag = googletag || {};
googletag.cmd = [‘load’, ‘my_ad_slot’];
(function() {
var gadscript = document.createElement(‘script’);
gadscript.async = true;
gadscript.src = ‘https://www.googletagservices.com/tag/js/gpt.js’;
var s = document.getElementsByTagName(‘script’)[0];
s.parentNode.insertBefore(gadscript, s);
})();
</script>
Loading the Script: The first part of the code (<script>…</script>) loads the necessary script from Google Tag Manager, which is a popular ad server platform. This script handles the ad request.
Defining the Ad Slot: The line “googletag.cmd = [‘load’, ‘my_ad_slot’]” instructs the ad server to load an ad specifically for the element with the ID “my_ad_slot”. It’s like reserving a specific billboard space in your city.
Creating the Placeholder: The section “<div id=’my_ad_slot’ style=’width:728px; height:90px;”></div>” defines a container on the webpage where the ad will be displayed. Here, it specifies the ad space’s dimensions (width and height).

What Is a ClickTag?
The clickTag variable was first introduced in Flash banner ads. Now, it’s supported by all major ad servers, and it works for HTML5 banner ads as well.
A clickTag will allow third-party ad servers used by the publisher to provide the URL that will be used to track the clicks on the banner that lead to the landing page opening.
An essential advantage of using a clickTag is the fact that it allows the ad-serving network to gain insights regarding the number of clicks you received for your banner and from which sites those clicks were received.
This type of data can help you, as an advertiser, evaluate the effectiveness of a campaign, so you can easily decide whether or not you need to make some changes to improve its impact.
Thanks to the clickTag, you can see and modify the URL without needing a developer.
What are the click tag guidelines from Google?
When you upload assets in Ad Manager, it will automatically detect the clickTags, and the good news is that you can change the click-through URL after you export the tags.
Here are the most important recommendations from Google when using the clickTag:
- The creative needs to use the click tag variable as the click destination;
- You shouldn’t use minification or obfuscation for the click tag because it needs to be easy for the ad server to read;
- You should avoid hard-coded click-through URLs in the asset because they will prevent Ad Manager from tracking clicks.
How can you generate an Ad Tag using Creatopy?
To be able to generate ad tags with Creatopy and use the ad delivery feature, you need to have the Pro or Plus subscription and activate the add-on. Let me walk you through all the steps.
The first step is to activate the ad serving add-on from your account. To do this, you can go to Manage account > Subscription > Customize, and choose the number of impressions you’ll use on a monthly basis. Alternatively, you can do this straight from the editor, when you finished a design or design set.
Now, let’s look at the flow when you’re in the editor, and you want to activate ad serving for an ad/ad set:
- Click on Ad Serving from the top right side of the screen, then on Enable. After doing this, you will see a window open with a few settings available.
- Add a ClickTag. Here you can add the URL for the landing page where you want the users to land after they click on your ad. You can also choose whether you want the landing page to open in a new tab or in the same tab.
- Select Responsive scaling. When enabled, this will automatically scale your designs while keeping the same aspect ratio so it can adapt to different screen resolutions and ad placements.
- Use Dynamic text. This is great to use if you want to tailor your ads and target your audience based on a geographical variable or setting custom variables. Learn more about how to use dynamic text in Creatopy.
- Set External tracking. Here you can set additional tracking pixels to get more insights such as impressions and clicks.
- Choose the Ad Network. This is where you need to selecty the ad networks that you want to use for your ad campaign. At the moment, there are 24 options to choose from. Optional: you can also add your ad network of choice in case you don’t find it in our list. Jus go to the Projects default area, click on Ad delivery, select Ad networks, then + Custom ad network.
- Get the ad tag code. You have two options: download a CSV or XLS file with the ad tag, or simply copy the code.
And you’re done! Now, you’re ready to start your ad campaign.
Final Thoughts
The right tools can make your job a lot easier and improve your productivity levels.
We hope that this article proves to be a helpful resource for you and that clickTags and ad tags are no longer a mystery for you.
To wrap it all up, I thought it would be best to end the article with some helpful resources you can use when working with ad tags.
If you’re looking for an ad tag generator, then you can go ahead and use the Ad Manager Tags Generator & Tester which is currently in beta. This generator will help you generate ad tags without having to manually edit the code.
You can use this Google ad tag tester to check this and receive validation results from Google’s support team.
If you have any additional questions, feel free to leave them in the comments section, and we’ll make sure to respond to them.