You shouldn’t have to do a complete 180 to accommodate creative automation. Quite the contrary. The right creative automation tool for you should easily fit into current workflows, adding a touch of efficiency to your design processes while allowing you to keep everything else business as usual.
At Creatopy, we understand this, with our primary focus being to make efficient ad design accessible to all. And part of this involves having the right integrations in place.
Below, we’ll give you the rundown of Creatopy’s integrations to help you understand how these add a layer of automation to every stage of your ad design process, from importing data all the way to launching ads on your preferred networks.
Table of contents
- An overview of Creatopy’s integrations
- Importing data assets
- Using third-party asset sources
- Automating asset creation
- Publishing and exporting ad designs
- Upcoming integrations
An overview of Creatopy’s integrations
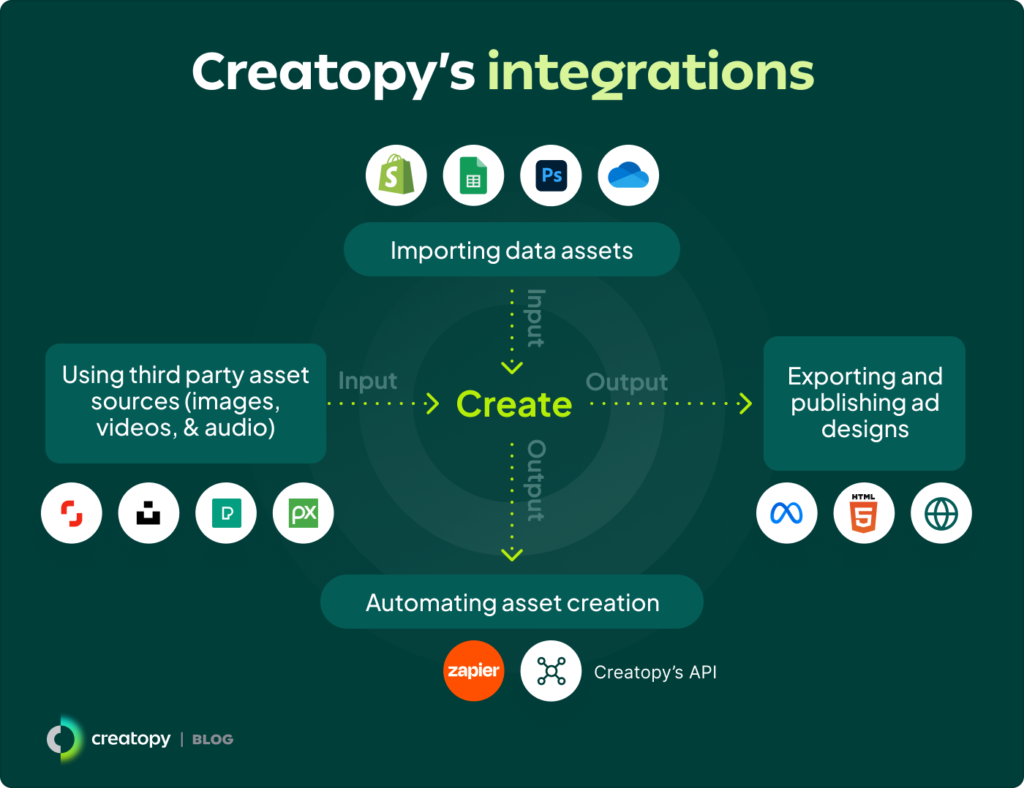
To guide you through Creatopy’s integrations, we’ll talk about them in four sequential stages, in the order of how they’d be used throughout the typical creative flow.
- Importing data assets directly from your feed data, cloud storage software, or Photoshop (PSD) files.
- Using third-party asset sources such as Shutterstock, Melodies, and Pizabary to add images, videos, and audio to your designs.
- Automating asset creation using Creatopy’s public API or Zapier integration.
- Publishing and exporting ad designs with customizable HTML5 settings directly to Creatopy’s integrated ad networks, custom ad networks, or social platforms through Creatopy’s integration with Meta.
1. Importing data assets
Creative automation lets you create a large amount of ads based on your products while avoiding tedious manual work. The right integrations can help you import datasets containing, for example, product images, pricing data, and advertising copy, using these as a springboard to create ads automatically.
Creatopy lets you import your data in three ways:
- Feed data: Upload structured information about your products in a CSV, Google Sheet, URL, or Shopify store format to create ads based on this data directly.
- Cloud storage: Add media files from your Google Drive or Dropbox.
- Adobe Photoshop or Illustrator (PSD) files: Import existing PSD files to further edit and animate each ad component or layer in Creatopy.
Feed data
To work with feed data and create ads for all your products at once, add your product data by uploading the CSV file or file URL into Creatopy. This file can have columns like:
- Product name
- Product image
- Headline
- Description
- Price
- CTA
Of course, these are flexible—you can bring whatever structured data you need. Each row under these columns should then reflect each item’s unique information.
Similarly, you can create ad variations using your Shopify catalog. Simply click on import feed and type in your Shopify store’s URL. Creatopy will then pull your product data straight from your Shopify store.
Once you’ve uploaded your product and ad data, bind each column—like product image and CTA—to specific design components in your Creatopy ads. With these connections secured, you can automatically create a large set of ads, with variations under each column translating to different ad variants.
Cloud storage
Connect your Google Drive or Dropbox account with Creatopy to pull media assets into the platform—JPGs, PNGs, SVGs, GIFs, videos, or audio files. You can then access these directly in Creatopy both at the individual and team levels.
Adobe Photoshop or Illustrator (PSD) files
If you already have a PSD design you want to use in your ad, import it into Creatopy directly. Name and select each specific layer of your design to then edit, animate, and scale these in Creatopy.
The benefit? Avoid going back and forth between apps, rebuilding ad designs from scratch, or having multiple employees deal with each stage of ad production separately. With this integration, you can build the master ad’s concept and then animate, resize, and scale it all in one go.
Read more: Import Your Photoshop Design to Creatopy and Scale Your Ad Production Further
2. Using third-party asset sources
If you need more creative media assets like images, GIFs, videos, and audio but don’t have these on hand, don’t worry. Creatopy’s third-party asset sources give you access to millions of ready-to-use assets. All you have to do is search through Creatopy’s library using the search bar or filters to find one perfect for your project.
Images
Creatopy’s image library is expansive. You can find images from free sources such as Pexels, Unsplash, and Pixabay, as well as premium ones like Shutterstock. Scroll through and pick the most suitable ones without leaving the app and scavenging for these externally.
GIFs and videos
You can also browse tons of videos and GIFs to add movement to your ads. Sourced straight from Pexels and accessible in Creatopy’s library, you can select and position these in your ads to create captivating ads free of copyright issues.
Audio
Integrating with Melodie for the best stock audio, Creatopy lets you sift through, choose from, and add plenty of tunes to your ads. You can use them as ambiance sound to smooth transitions or background noise to breathe life into your ads.
3. Automating asset creation
If you want to avoid manually creating ads entirely, you can easily trigger their creation and export with Creatopy’s API and Zapier integrations. Similarly, you can use these to manage existing designs, projects, comments, and other similar design-related tasks.
Exclusively accessible by users with Creatopy’s Enterprise plan, these integrations can reduce the burden of asset creation, allowing users to stay on top of design requirements at a fraction of the effort that’s typically required.
Creatopy’s public API
Enterprise users can create custom integrations with Creatopy’s public API. They can use it to automate design-related tasks such as:
- Accessing and modifying existing designs and display ad templates from specific applications.
- Automating exports of designs in different formats, ready to share for any purpose.
- Managing collaboration on designs, including comments, for more straightforward feedback.
Zapier integration
You can also rely on Creatopy’s integration with Zapier, which allows you to automatically scale your assets by linking Creatopy to over 5000 applications.
Establishing this connection is simple—and it all starts with creating a template in Creatopy. Name each template layer and, in Zapier, specify which layer or element you’d like to be changed with each new ad generated. Make sure to name each layer differently so Zapier can easily identify and distinguish them. Once you’ve configured the settings, you can delegate ad creation to Zapier, automatically creating hundreds of ad variations based on your chosen brand template.
Besides creating new ads, you can also use Zapier to trigger specific events or actions. Generate design variations based on spreadsheet data, create ads from an e-commerce platform, or send newly generated creatives directly to cloud storage, social media platforms, or an email inbox.
4. Publishing and exporting ad designs
If you’re happy with your ads, you can export or publish them straight from Creatopy. Using Creatopy’s integrations, you can launch them to your ad networks—including custom ones—or social media platforms as soon as you’re done designing them, getting them up and ready in no time.
Ad serving with integrated ad networks
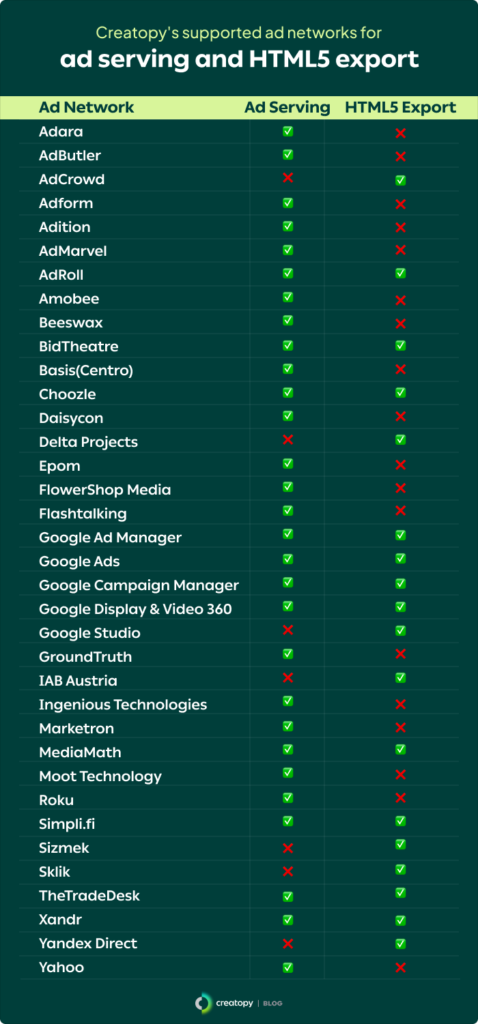
Creatopy’s built-in connections with ad networks like Google Ads and AdForm let you push, publish, and deliver your ad creatives to the right audience. Ad serving saves you from downloading and manually uploading each ad design to select ad networks.
See a list of all the supported ad networks and HTML5 exports in Creatopy below.
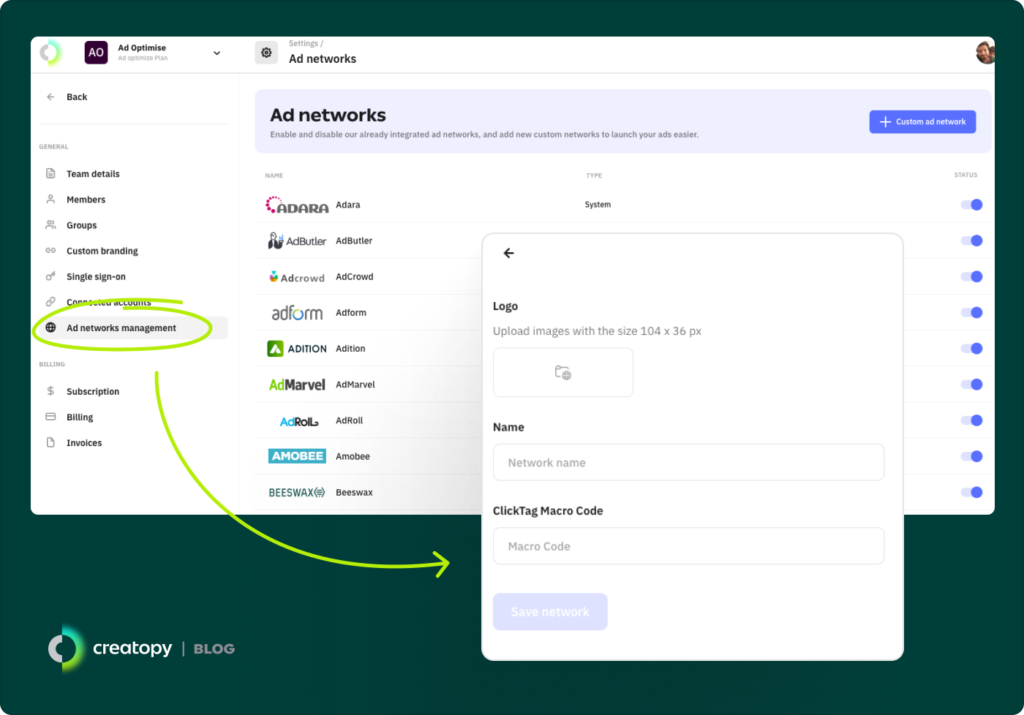
Custom ad networks
If you don’t see your ad network in the image above, don’t worry. You can also add custom networks to your list of networks in Creatopy. All you need to do is add the following details:
- Network logo
- Network’s name
- ClickTag macro code used to track clicks inside the network
Your team can then use this new ad network in Creatopy as usual.
Meta integration
If you’re running product-driven campaigns on Facebook or Instagram, Creatopy’s Meta integration can simplify your workflow and boost your results. With this integration, you can export catalog ads created in Creatopy directly to Meta platforms, streamlining the process of setting up Dynamic Product Ads (DPAs) and reaching your audience with relevant content tailored to their behavior, interests, and intent.
HTML5 exports
You can export your creatives in HTML5 format and, depending on the demand-side platform you’re using, make additional, platform-specific adjustments to them. These include:
- Creating a custom HTML5 script tailored to your ad networks.
- Exporting in low, medium, high, uncompressed, or custom image quality.
- Optimizing images in ads to reduce their impact on the file size.
- Converting text boxes into custom fonts.
- Adding a landing page to your design, specifying how it opens—new tab, same tab, parent window, or original window.
- Adding a fallback image.
- Meeting clickTag standards for each ad network to make sure ads are clickable and measurable.
Coming soon: Integrations with Figma, Veeva, and Bynder
At Creatopy, we aim to make ad automation as intuitive and accessible as possible, and part of this involves expanding our ecosystem of integrations to make this workflow as smooth as possible.
Here’s a brief overview of some exciting integrations we’re currently working on for 2025:
Figma
The Figma integration will enable users to pull complex Figma designs straight into Creatopy, keeping all original layers and settings intact. With this integration, users will be able to continue editing their Figma designs in Creatopy while also simplifying the process of animating, resizing, and exporting these designs as ads.
Veeva
Specific to those in the healthcare industry, Creatopy’s integration with Veeva will speed up the time taken to upload ad designs for FDA approval. With a single click, users will be able to generate detailed PDFs containing Important Safety Information (ISI) alongside other essential regulatory requirements. This will significantly slash the time and effort required to maintain compliance when launching advertising campaigns.
Bynder
The Bynder integration with Creatopy will work similarly to Creatopy’s existing integrations with Google Drive and Dropbox. It’ll allow users to access their assets stored within Bynder, easily pulling these into their Creatopy designs without cumbersome back-and-forths involving downloads and uploads.
Creatopy’s integrations in a nutshell
Whether you’re creating ads based on feed data, sifting through stock assets, or automating ads with Creatopy’s API, Creatopy’s integrations take the hassle out of ad creation—be it at a small or large scale.
They keep creation localized, saving you the trouble of spreading yourself thin across multiple platforms during ad creation. And when you’re ready, you can publish your ads straight to your chosen social or ad network, no intermediary required.
If you’re ready to give quick, easy, and efficient ad creation, start your free trial with Creatopy today.